

NEARLY FREE ROCKET STOVE
A “rocket stove” burns small twigs super-efficiently with almost no smoke. It’s perfect for camping, emergencies, or backyard cooking when fuel is scarce. The classic “#10 can” version costs nothing if you scavenge the parts from curbside trash and/or a restaurant dumpster. Total cash outlay is usually $0–$2 for insulation, if you don’t have any. Nearly free, hyper-efficient heat made from trash.
Materials
1 clean #10 metal can (restaurant-sized - 6"
diameter and 7" tall), or a used clean gallon paint can can be used instead
3 clean standard soup cans (11–15 oz, and 3" diameter) and one slightly taller can, with labels removed
Scrap insulation: wood ashes, dry dirt or sand, perlite from old potting soil or the garden supply store, or crushed glass bottles.
“Sharpie” marker
tin snips or old steak knife
Optional: church-key can opener, pliers, leather gloves, small metal file to smooth cut edges, pieces of wire coat hanger or cast iron gas stove trivet to set cooking pot on.
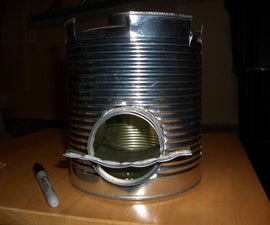
Prep the #10 can - Remove one end with the safety opener; keep the lid. Take one of the four soup cans and trace the round shape onto the #10 can, 1" above the bottom rim. Cut out the soup can size hole on the side. This is the fuel/feed port.
Make the chimney - Take one soup can; remove one end and trace the shape onto the side of the soup can, 1" above the bottom rim so that it will line up with the hole on the #10 can. Cut out the soup can size hole. Take another soup can and remove both ends. This becomes the vertical burn tunnel (chimney). Nest inside lower soup can so they fit snugly. Place the chimney into the #10 can so it sits centered on the bottom.
Build the horizontal fuel port and shelf - Take the remaining soup can and cut off both ends. fit it through the side of the #10 can and into the side hole of the soup can chimney. Using the taller can with both end removed and cut from top to bottom, you will want to flatten it then cut out a small T shaped shelf roughly the same width as the soup can with the wider portion at the top to keep it from sliding all the way inside the stove. This will fit into the soup can mouth of your stove. This is what the wood will rest on and at the same time allow air to travel into the stove from underneath the shelf.
Insulate the burn tunnel - Mix your insulation (ashes + a little water to make paste, or dry perlite or dirt, or sand, or crushed glass). Pack tightly around the outside of the L-shaped burn tunnel inside the #10 can. Fill to ½" below the top rim. This insulation is the magic, it keeps heat in the fire and not the outer can.
Cap & grate - Cut a soup can size hole in the center ofl the saved #10 lid. Place on top of insulation. For a pot stand, bend three 6" pieces of coat-hanger wire into U-shapes and poke through the lid to hold pots about 1" above the lid, so that your pot doesn’t sit directly on the chimney.
Fire It Up - Push 3–4 pencil-thick dry twigs through the feed port, on top of the shelf; light the ends inside the elbow. Add sticks as they burn down. In 60 seconds you’ll have a clean blue flame shooting out the chimney. You can boil a quart of water in 4–6 minutes on handfuls of twigs.
Safety & Tips - Use outdoors only. Caution, rocket stove will get hot. Let ashes and stove cool before dumping. If the outer can warps after multiple fires, just find another #10 can or empty paint can.