
You can make a DIY solar oven using common household items. Harness the sunlight to cook at low to moderate temperatures (up to 200-250°F) like you would use a crockpot. It’s perfect for basic cooking and won’t burn or dry out your food.
Materials:
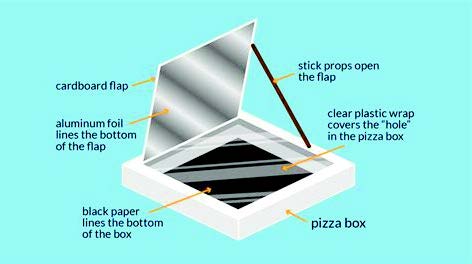
Cardboard box - Medium-sized with a lid or flaps (e.g., a pizza box or shipping box, about 12-18 inches wide). Even a shoebox will work for a tiny oven.
Aluminum foil - Enough to line the inside of the box and flaps (about 1-2 standard rolls’ worth).
Plastic wrap for the window, or a safe piece of glass such as a refrigerator shelf or glued in picture frame
Black construction paper or black paint - to absorb heat inside the box.
Tape or glue - to secure foil and paper
Scissors or utility knife - to cut cardboard and plastic.
Ruler or stick - to prop open the reflector flap.
Optional: Newspaper , or old towels for insulation.
Instructions:
If using a regular box, cut the flaps to create a single large flap for the reflector (or keep all flaps for multiple reflectors). On the lid or top flap, draw a square about 1-2 inches smaller than the edges (e.g., for a 12x12-inch lid, draw a 10x10-inch square). Cut along three sides of the square to create a flap, leaving one side attached as a hinge. Fold this flap up to form an opening. This will be covered with plastic to let sunlight in. Cover the inside of the box (bottom and sides) with aluminum foil, shiny side up, to reflect sunlight. Secure with tape or glue. Line the underside of the window flap and any other box flaps with foil to act as reflectors. Place black construction paper or paint the inside bottom of the box black to absorb heat. If using paper, tape or glue it over the foil on the bottom only. Stretch plastic wrap tightly over the square opening on the lid to create a window, taping it securely to the inside edges to create an airtight seal. Use multiple layers (2-3) for durability. Use a glass sheet instead of plastic wrap for higher durability (if available). Add a second box around the first with insulation (e.g., newspaper) for better heat retention if desired.
Place the box in direct sunlight on a clear day. Angle the reflector flap(s) to direct sunlight into the box. Use a ruler or stick to prop the flap open at about a 45-degree angle. Place food in a small, dark-colored pot or pan (e.g., a black metal tray or tin) to absorb heat. Set it on the black surface inside the box.
Close the lid, ensuring the plastic window is over the food. Position the oven to face the sun directly, adjusting every 30-60 minutes to track the sun’s movement.
Cooking times vary: Simple foods like nachos or hot dogs may take 1-2 hours; denser foods like rice or vegetables may take 3-4 hours. Check periodically.
Solar ovens are a good option year around on clear, sunny days with minimal wind. Use oven mitts when handling hot pots. Avoid touching the plastic wrap when hot, as it may soften. An oven thermometer placed inside or a meat thermometer placed in the food is helpful.
This is only one of many options for a DIY solar oven. Check out the projects at:
https://homestead-and-survival.com/18-diy-solar-cooker-plans
There are also a variety of commercially available solar ovens ranging in price from the Sunflair or Teenyyou cooker in a bag style at under $60 on Amazon or Ebay, to more expensive parabolic cookers or the original Sun Oven (pictured at top) that will set you back a couple of hundred dollars.